

Injection molded parts can be identified by specific features such as parting lines, gate separation marks, and ejector pin marks. Parting lines are seams where mold halves meet, gate separation marks indicate where molten plastic entered the mold, and ejector pin marks show where pins pushed the part out of the mold. These characteristics, often visible under magnification, provide clear indicators of the injection molding process and can include additional details like cavity numbers or dates for quality control and traceability.
1. Parting Line in Injection Molding

A parting line is the visible seam on a molded part where the two halves of the mold meet. It occurs because the mold must separate to eject the part, creating a line where the two halves join. To identify a parting line, look for a thin, raised line or seam that runs around the edge or surface of the part. This line can often be found along the perimeter or where different sections of the mold meet. Using a magnifier can help spot these lines more easily. The prominence of the parting line can vary based on the mold’s precision and the molding process, with high-precision molds leaving less noticeable lines.
2. Gate Separation in Injection Molding

Gate separation refers to the point where the molten plastic enters the mold cavity, which then leaves a small mark on the finished part once it cools and the gate is removed. This mark, known as the gate vestige, is usually a small, raised spot or a slight depression. Common locations for gate separation marks include the edges or surfaces of the part, often in less conspicuous areas, to minimize their impact on aesthetics. The appearance can vary depending on the type of gate used, such as a pinpoint gate, which leaves a tiny mark, or an edge gate, which may leave a larger, more noticeable mark. Identifying gate separation involves looking for these small imperfections, often found near the parting line or other mold flow entry points. Using magnification can help reveal these subtle features more clearly.
3. Ejector Pin Marks in Injection Molding
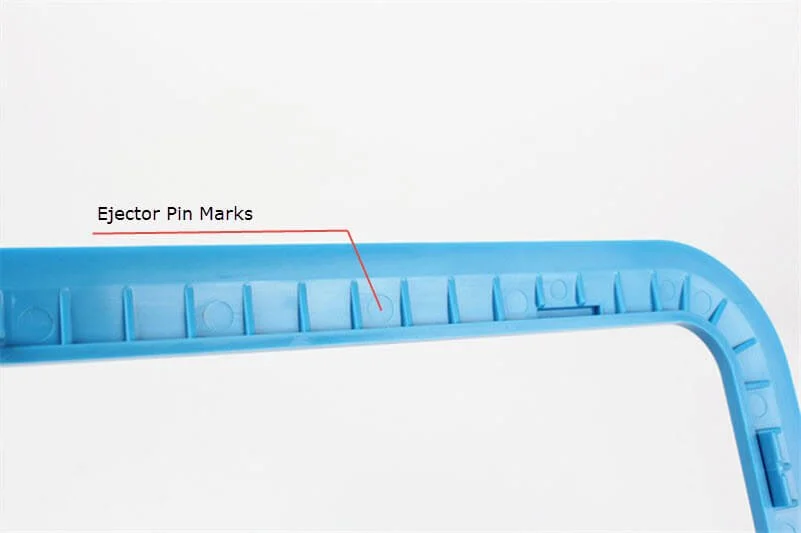
Ejector pin marks are small circular or rectangular indentations left on a molded part by the pins used to push the part out of the mold after it has solidified. These marks are typically found on the surface of the part that was in contact with the mold during cooling. To locate and identify ejector pin marks, examine the part closely, especially on flat or broad surfaces. These marks are usually recessed or slightly raised and are often uniformly distributed across the part. They can sometimes include additional details like cavity numbers or dates, which are used for quality control and traceability. Using a magnifying tool can help identify these marks more easily, especially on parts with fine textures or intricate details.
FAQs Related To Injection Mold
1. What is the function of a gate in injection molding?
The gate in injection molding serves as the entry point for molten plastic to flow into the mold cavity. It controls the flow rate, pressure, and direction of the plastic as it fills the mold, ensuring that the material is evenly distributed and that the final part forms correctly.
2. How do you decide on gate location in injection molding?
Gate location in injection molding is determined based on factors such as the part’s geometry, wall thickness, and intended use. Ideally, the gate should be placed in a position that allows for even filling and minimizes potential defects like warping or air traps. Additionally, the gate should be located in a less visible area to reduce the impact of gate vestiges on the part’s aesthetics.
3. What products are injection molded?
Injection molding is used to produce a wide range of products, including consumer goods, automotive components, medical devices, packaging items, electronics housings, and toys. This process is favored for its ability to produce complex, high-precision parts in large volumes.
4. Where do you put parting lines in injection molding?
Parting lines in injection molding are typically placed along the edges or surfaces where the mold halves meet. The location is chosen based on the part’s design to minimize visibility and impact on the part’s functionality and appearance. Parting lines are often positioned in areas that are less critical to the part’s performance or where they can be easily removed or hidden.
5. How to Avoid Ejector Pin Marks in Injection Molded Parts?
To avoid ejector pin marks in injection molded parts, consider using the following strategies:
- Optimize Ejector Pin Placement: Position ejector pins in non-critical areas or where marks will be less noticeable.
- Use Larger Pins: Larger pins distribute the ejection force more evenly, reducing the likelihood of visible marks.
- Reduce Ejection Force: Adjust the ejection force to the minimum necessary to release the part without causing marks.
- Polish Ejector Pins: Ensure that the pins are smooth and polished to minimize the imprint left on the part.
- Apply Textures: Adding textures to the part’s surface can help disguise ejector pin marks.
Related Articles
- Medical Injection Molding: Precision in Healthcare
- Liquid Silicone Rubber Injection Molding: A Detailed Guide
- Mastering Injection Molding Tolerances: Key Insights
- Reaction Injection Molding: Process, Benefits and Uses
- Injection Molding Defects and Their Solutions
- Aluminum Injection Molding: Cost, Benefits, and Design
- ABS Injection Molding: Key Benefits, Process
- Ultimate Guide to HDPE Injection Molding
- 10 Common Plastic Resins for Injection Molding
- Injection Molding vs. Compression Molding


 English
 Arabic
 German
 Spanish
 French
 Italian
 Javanese
 Korean
 Portuguese
 Russian
 Hindi
 Chinese
